
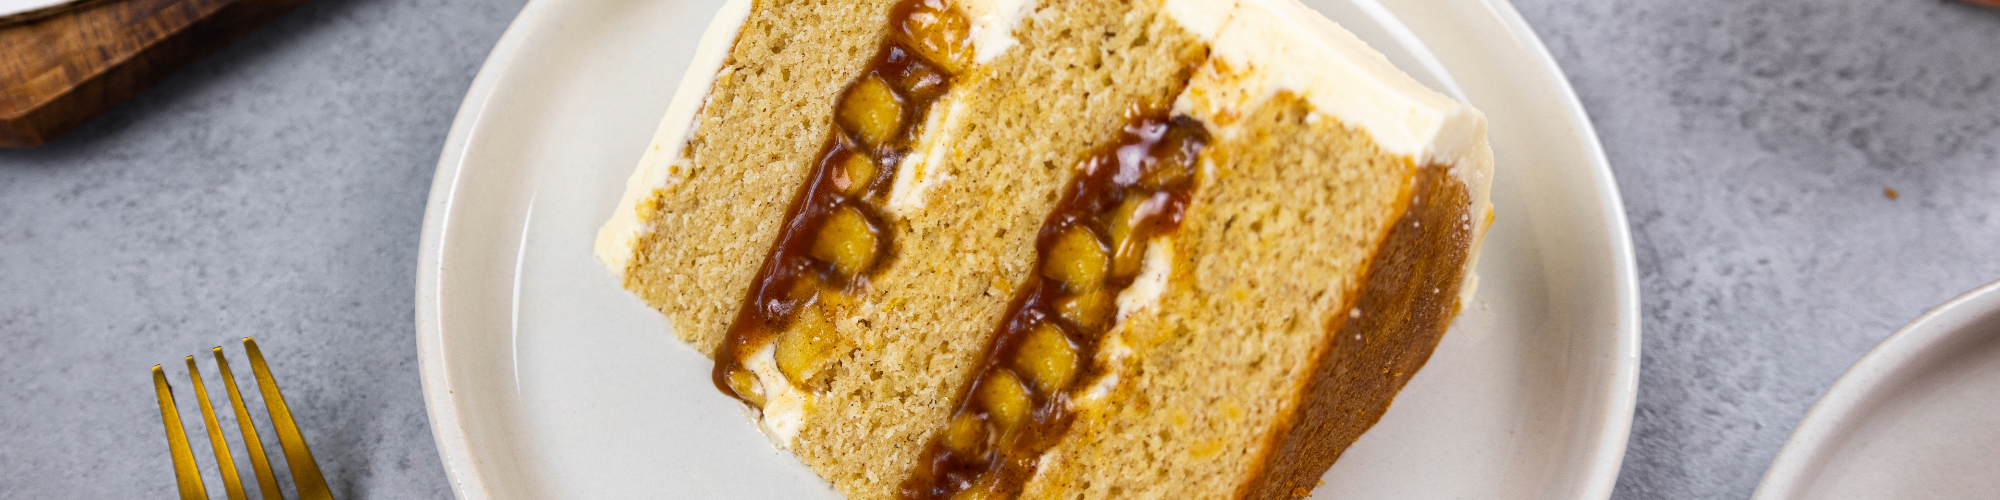

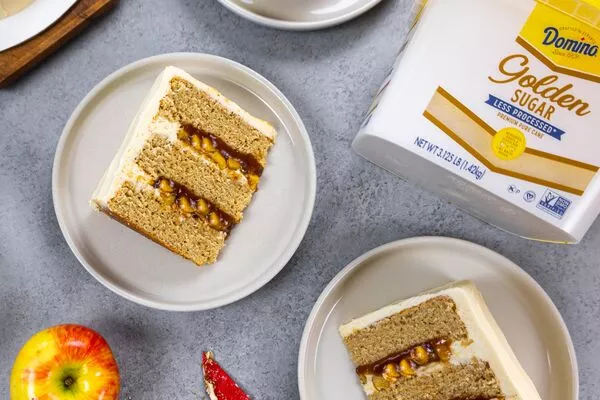
Caramel Apple Cake
Categories:
Ingredients
Apple Filling
4 Honeycrisp apples, large
- 3 Tbsp Unsalted butter
- 1 cup Domino® Golden Sugar
- 2 Tsp Ground cinnamon
- 1/4 Tsp Salt
- 2 Tbsp Water
- 2 Tbsp Cornstarch
Caramel Sauce
1 cup Domino® Golden Sugar
- 6 Tbsp Unsalted butter, room temperature
- 1/3 Cup Heavy cream, room temperature
- 1/2 Tsp Fine salt
Spice Cake Layers
3 Cups All-purpose flour
- 1 1/2 Cups, packed Domino® Light Brown Sugar
- 1 1/2 Cups Domino® Granulated Sugar Easy Baking Tub
- 2 1/2 Tsp Baking powder
- 2 Tsp Ground cinnamon
- 1 Tsp Fine salt
- 1/2 Tsp Ground Ginger
- 1/2 Tsp Ground Nutmeg
- 1/2 Cup Unsalted Butter, room temperature
- 4 Large eggs, room temperature
- 1 1/2 Cups Sour cream, room temperature
- 1/2 Cups Vegetable oil
- 1 Tsp Vanilla extract
Caramel Buttercream Frosting
2 Cups Unsalted Butter, room temperature
- 1/3 Cup Caramel sauce (recipe above), room temperature
- 1 Tsp Vanilla extract
- 1/2 Tsp Salt
- 6 Cups Domino® Powdered Sugar
- 1 Tbsp Heavy cream
Rate Recipe
Instructions
Bake Mode
Prevent your screen from going dark as you follow along.
Prep Time: 30 minutes / Cook Time: 32 minutes / Yields: One 8-inch layer cake; 24 servings
Apple Filling
Step 1
Peel 4 large apples, remove the core and cut into quarter inch pieces.
Step 2
Add the apple pieces, 3 Tbsp butter, 1 cup Domino® Golden Sugar, 2 tsp cinnamon, and 1/4 tsp salt into a large skillet. Heat over medium-high heat, using a spoon or spatula to stir the mixture occasionally. Cook until the mixture begins to bubble, then reduce the heat to medium.
Step 3
In a small bowl whisk together 2 Tbsp of water and 2 Tbsp of cornstarch to make a cornstarch slurry. This will help thicken the filing. Pour into the apple mixture and simmer for 5-10more minutes, stirring occasionally. Cook just until the apples are soft. If you over-cook them they'll fall apart and look more like applesauce than apple pie filling!
Step 4
Transfer the filling into a separate container and chill in the fridge. Once fully cooled, the filling can be stored in the fridge in a container for up to a week (it doesn't freeze well)
Caramel Sauce
Step 1
Next, make the caramel sauce. Turn stove to medium heat and place a pot over the element.
Step 2
Pour in 1 cup of Domino® Golden Sugar gradually, adding 1/4 cup at a time. Wait until the sugar is mostly liquified, then add the next increment of sugar.
Step 3
As the sugar melts, it will gradually deepen in color.
Step 4
Stir occasionally until the sugar is fully dissolved and is an amber color. Then turn off the heat.
Step 5
Mix in 6 Tbsp of butter slowly (1 Tbsp at a time), then stir in 1/3 cup of cream and 1/2 tsp salt. The mixture will be very thin but will thicken as it cools.
Step 6
Pour into a separate container, then place in fridge to cool for 20 minutes.
Spice Cake Layers
Step 1
Preheat oven to 350°F / 175°C. Line three 8" pans with parchment rounds and grease with non-stick baking spray.
Step 2
Whisk 3 cups flour, 1 1/2 cups Domino® Light Brown Sugar, 1 1/2 cups Domino® Granulated Sugar Easy Baking Tub, 2 1/2 tsp baking powder, 2 tsp cinnamon, 1 tsp salt, 1/2 tsp ginger and 1/2 tsp nutmeg in a large bowl.
Step 3
Use an electric mixer to mix 1/2 cup of butter into the dry ingredients on a low speed. Mix until the mixture looks like sand and no large chunks of butter remain.
Step 4
In a separate bowl, whisk together 4 large eggs, 1 1/2 cups sour cream, 1/2 cup vegetable oil and 1 tsp of vanilla extract.
Step 5
Slowly mix the wet ingredients into the dry ingredients on a low speed until just incorporated.
Step 6
Scrape down the sides of the bowl with a rubber spatula, then beat on a low speed for a few more seconds to make sure everything is properly mixed.
Step 7
Divide the batter evenly between the prepared pans.
Step 8
Bake for 32-35 minutes or until a toothpick comes out with a few moist crumbs. Allow the pans to cool for 10 minutes, then run a small offset spatula around perimeter of the pan to separate the cake from the pan.
Step 9
Flip the cake layers onto a wire rack to cool.
Step 10
Use a serrated knife to level the tops of the layers once they're fully cooled.
Step 11
If you make these cake layers in advance and freeze them, let them thaw for about 20 minutes before making your cake. The cake layers should still be slightly cold to the touch, which will make it easier to assemble your cake.
Salted Caramel Buttercream Frosting
Step 1
Once the caramel has cooled to room temperature, make the caramel buttercream.
Step 2
Beat 2 cups of butter on a medium speed for 30 seconds with a paddle attachment or hand mixer, until smooth.
Step 3
Mix in 1/3 cup of cooled caramel, 1 tsp vanilla and 1/2 tsp salt on a low speed.
Step 4
Slowly mix in 6 cups of Domino® Powdered Sugar on a low speed. Halfway through mixing, add in 1 Tbsp of heavy cream to make the frosting easier to mix.
Step 5
Beat on low until the ingredients are fully incorporated, and the desired consistency is reached.
Assembling this Salted Caramel Apple Cake
Step 1
Stack and frost the spiced cake layers on a greaseproof cake board using a dab of frosting to help stick the first cake layer to the board.
Step 2
Spread an even layer of caramel buttercream on top of the first cake layer. Pipe a ring around the cake layer to act as a frosting dam to keep the apple filling in place.
Step 3
Spread 1/2 of the apple filling inside the frosting ring. Drizzle half of the remaining caramel over the apple filing. Top with the next cake layer and repeat.
Step 4
Chill the cake in the freezer for 5 minutes once the cake layers are stacked to help lock the filling in place and make it easier to crumb coat the cake.
Step 5
Spread a thick coat of caramel buttercream around the cake using an offset spatula to give it a beautiful textured finish.
Rate Recipe


Meet the Chef:
Chelsey White
@chelsweets
Meet Chelsey - a self-taught baker who left corporate America to pursue her love of cake decorating and content creation! She loves testing out new recipes and techniques, and share everything she learns along the way. Explore her recipes and tutorials that are aspirational yet achievable!
Deliciousness Delivered to You
Join our E-newsletter community and you’ll be among the first to receive the latest special offers, recipes, tips and more. Join us!