
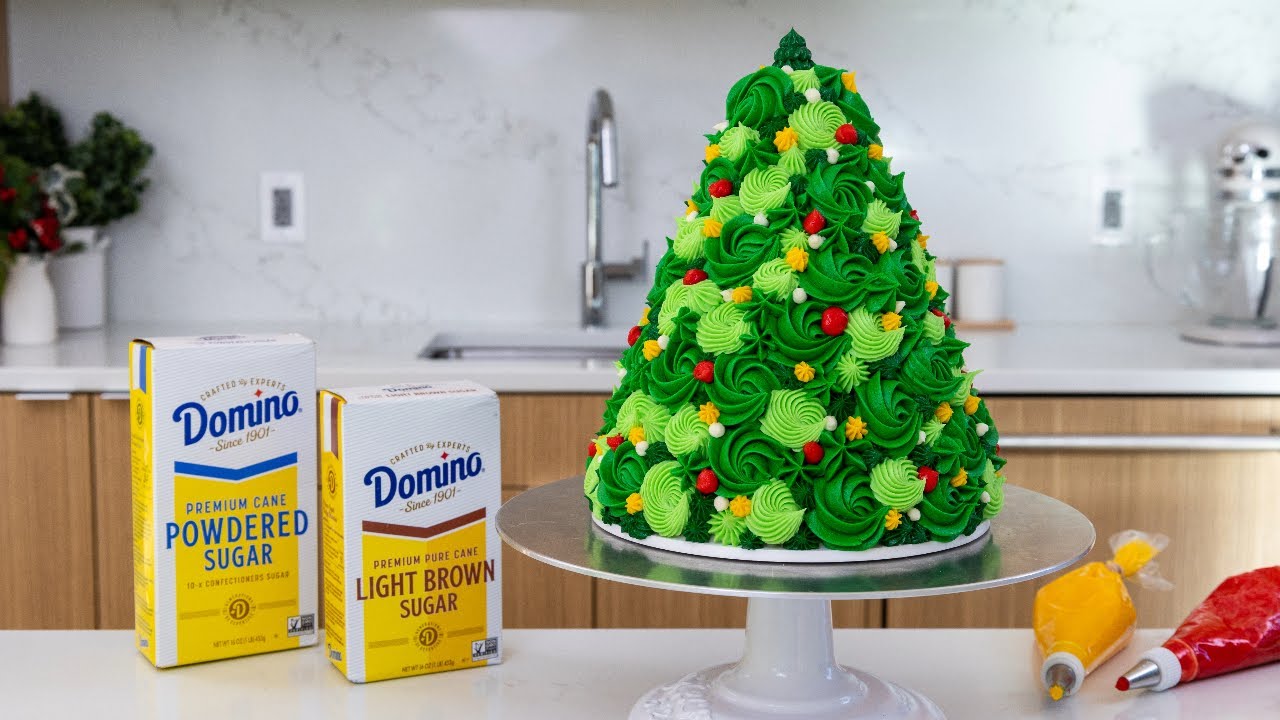

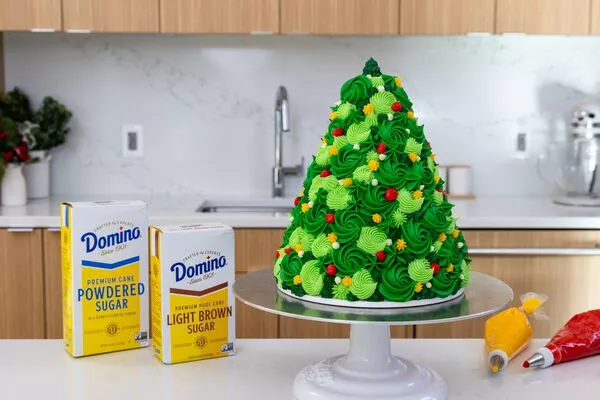
Christmas Tree Cake
Categories:
Ingredients
CAKE
3 cups All-purpose flour
- 1 1/2 cups Domino® Golden Sugar
- 1 1/2 cups Domino® Light Brown Sugar
- 2 1/2 tsp Baking powder
- 1 tsp Fine salt
- 2 tsp Ground cinnamon
- 1 tsp Ground ginger
- 1/2 tsp Ground nutmeg
- 1/2 cup Unsalted butter, room temperature
- 4 Large eggs, room temperature
- 1 cup Sour cream, room temperature
- 1/2 cup Unsalted applesauce
- 1/2 cup Vegetable oil
- 1 tsp Vanilla extract
- 2 drops Green gel food coloring
VANILLA BUTTERCREAM
2 cups or 4 sticks Unsalted butter, room temperature
- 1 Tbsp Vanilla extract
- 1 tsp Fine salt
- 7 cups or a 2 lb. bag Domino® Powdered Sugar
- 1/3 cup Heavy cream or whipping cream
- 1 drop Green, Red, and yellow gel food coloring
Rate Recipe
Instructions
Bake Mode
Prevent your screen from going dark as you follow along.
Prep Time: 15 minutes / Cook Time: 30 minutes / Yields: 1 layer cake; feeds 24 people
Spiced Cake Layers
Step 1
Preheat oven to 350°F/175°C. Line one 7", two 6", and two 4"pans with parchment rounds and grease with non-stick baking spray.
Step 2
Mix together 3 cups flour, 1 1/2 cups Domino® Golden sugar, 1 1/2 cups Domino® Light Brown sugar, 2 1/2 tsp baking powder, 1 tsp salt, 2 tsp cinnamon, 1 tsp ginger and 1/2 tsp nutmeg in a large bowl until fully combined.
Step 3
Mix 1/2 cup of unsalted butter slowly into the dry ingredients on a low speed. Continue to mix until no large chunks of butter remain. Mix in 4 large eggs on low until just incorporated, 2 at a time.
Step 4
Add 1 cup sour cream, 1/2 cup unsweetened apple sauce, 1/2 cup vegetable oil and 1 tsp of vanilla extract. Mix on a low speed until just incorporated. Scrape down the sides of the bowl with a rubber spatula, then beat on a medium speed for about a minute to make sure everything is properly mixed together.
Step 5
Use the green gel food coloring to color half the batter light green and half of the batter a darker shade of green. Add spoonfuls of both colors of batter into the prepared pans, filling them each to the same height (about 1-inch high). Then use a butter knife or offset spatula to swirl the batter together to create a marbled look.
Step 6
Bake for 28-33 minutes or until a toothpick comes out with a few moist crumbs. Let the cake layers cool in the pans for 10 minutes, then run a small offset spatula around perimeter of the pan to separate the cake from the pan. Flip the cake layers onto a wire rack to cool.
Step 7
Use a serrated knife to level the tops of the layers once they're fully cooled, then stack the cake layers and trim them into the tapered shape of a Christmas tree.
Vanilla Buttercream Frosting
Step 1
While the cake layers bake and cool, make the vanilla buttercream frosting. Beat 2 cups of butter (4 sticks) on a medium speed for 30 seconds with a paddle attachment until smooth.
Step 2
Mix in 1 Tbsp of vanilla extract and 1 tsp of salt. Gradually mix in 7 cups of Domino® powdered sugar and 1/3 cup of heavy cream on a low speed. If the frosting is too thick, add in additional cream (1 TBSP at a time). If the frosting is too thin, add in more powdered sugar (quarter of a cup at a time).
Cake Assembly
Step 1
Stack and frost the cake layers on a greaseproof cake board or flat plate using a dab of frosting to help stick the first cake layer to the board. Stack the layers from largest to smallest, to create a Christmas tree shape.
Step 2
Spread an even layer of buttercream on top of each cake layer. Once the layers are stacked, insert a wooden dowel or thick straw into the center of the cake layers to help keep them in place.
Step 3
Cover the cake in a thin coat of frosting. Smooth using an offset spatula or bench scraper, then chill the cake in the fridge (30 minutes) or freezer (10 minutes) until the frosting is firm to the touch.
Step 4
While the cake chills, color the remaining buttercream. Scoop 1/2 cup of white frosting into a small piping bag fit with a small round piping tip. Set aside.
Step 5
Color 1/2 cup of frosting red with gel food coloring. Place this in a small piping bag fit with a small French tip. Set aside. Color 1/2 cup of frosting yellow with gel food coloring. Place this in a small piping bag fit with a small round tip. Set aside.
Step 6
Color half of the remaining frosting light green, and color the other half dark green with green gel food coloring. Place each frosting in its own large piping bag fit with an open star tip. Set aside.
Step 7
Use the green frosting to pipe rosettes around the cake, then fill in with frosting dollops of red, yellow, and white frosting.
Additional Tips:
- If you make the cake layers in advance and freeze them, let them thaw for about 20 minutes before making your cake. The cake layers should still be slightly cold to the touch, which will make it easier to assemble your cake.
- If you want to add a star to the top of this Christmas tree cake, use melted dark chocolate to pipe a star onto a piece of parchment paper. Once it’s hardened, brush it with gold luster dust and place it on top of the cake.
- Properly measure your flour (spoon into the cup measure, then level) or use a kitchen scale to measure your dry ingredients.
- Ingredients at room temperature mix together better. Set out any cold ingredients ahead of time.
- Chill your cake layers in the freezer for about 20 minutes before assembling the cake. This makes it easier to stack and frost.
- Insert a thick bubble tea straw or wooden dowel through the layers once they're stacked to help keep the cake stable as you decorate it.
- If your hands run hot, wrap a paper towel, or thin kitchen towel around your piping bag to prevent the transfer of heat from your hands into the frosting.
Rate Recipe


Meet the Chef:
Chelsey White
@chelsweets
Meet Chelsey - a self-taught baker who left corporate America to pursue her love of cake decorating and content creation! She loves testing out new recipes and techniques, and share everything she learns along the way. Explore her recipes and tutorials that are aspirational yet achievable!
Deliciousness Delivered to You
Join our E-newsletter community and you’ll be among the first to receive the latest special offers, recipes, tips and more. Join us!