

Gluten-Free Apple Hand Pies
Categories:
Ingredients
Gluten Free Handpie Crust
11 oz Gluten Free Cup for Cup Flour
- 1 1/2 teaspoons Baking Powder
- 1 teaspoon Kosher Salt
- 12 oz Unsalted Butter, cold
- 4 oz Sour Cream
- Additional gluten free flour for rolling
Apple Filling
14 oz Apples, peeled and diced into ½ inch pieces (weigh after peeling and dicing)
- 1 oz Unsalted Butter
- 1 oz Domino® Light Brown Sugar
- 2 oz Domino® Golden Sugar
- 1 teaspoon Kosher Salt
- 2 teaspoons Cornstarch
- 1 teaspoon Ground Cinnamon
- 1/4 teaspoon Ground Ginger
- 1/8 teaspoon Ground Nutmeg
- 1 teaspoon Vanilla Extract
For Baking
1 Egg, large
- 1 tablespoon Milk or Water
- As Needed Domino® Golden Sugar for sprinkling the hand pies before baking
Rate Recipe
Instructions
Bake Mode
Prevent your screen from going dark as you follow along.
Prep Time: 3 hours / Cook Time: 3 hours / Yields: 10-12 hand pies
Gluten Free Handpie Dough
Step 1
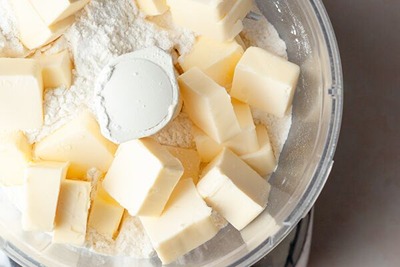
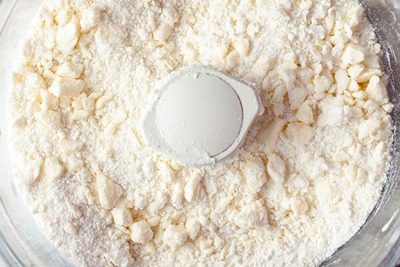
Add the gluten free flour, baking powder, and kosher salt to the bowl of the food processor.
Step 2
Slice the cold butter into pieces (about tablespoon size or walnut halves) and add to the dry ingredients. This can be done beforehand, but ensure the butter stays cold until ready to use.
Step 3
Quickly pulse the butter 2-3 times. This is just to break up the hunks of butter into smaller pieces. You want to see still big chunks as the butter will be further broken up once we add the sour cream.
Step 4
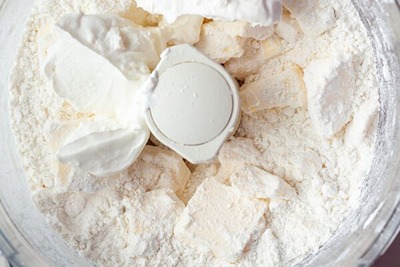
Add the cold sour cream and pulse another 2-3 times quickly until the butter pieces are the size of peas. The dough should NOT come together in the food processor. If it does, it is over mixed.
Step 5
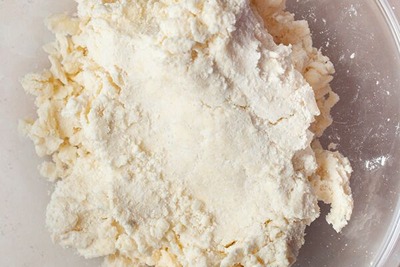
Transfer the dough to a large bowl and with your hands bring the dough together. This can also be done on a clean kitchen counter but I prefer using a bowl to contain the mess in one bowl.
Step 6
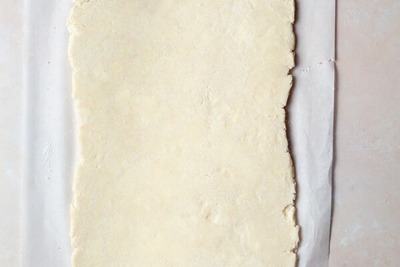
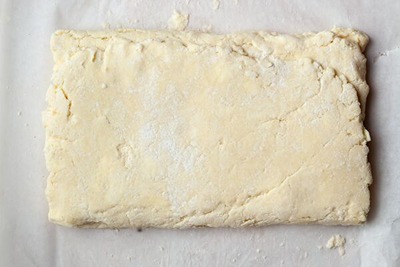
Once the dough has been gathered, transfer it to a parchment-lined sheet tray and shape it into a rectangle. The exact size does not really matter at this point but make sure the dough is just about 1" tall. This will make rolling out a lot easier.
Step 7
Cover the gluten free pie dough with some plastic wrap and refrigerate for 10-15 minutes.
Dough Tri-Fold
Have some extra gluten free flour on hand to ensure the dough does not stick to the parchment paper or rolling pin.
Step 1
After resting the dough in the fridge for 10-15 minutes, transfer it to a floured surface like parchment paper or a clean countertop. If the dough has been refrigerated for longer than 15 minutes, allow it to sit for a few minutes before rolling to make it easier to work with.
Step 2
Roll the dough into a rectangle about ¼ inch (6mm) thick. Don't worry about the exact size.
Step 3
Fold the top third of the dough down to the center, then fold the bottom third up over the top, like folding a letter. This creates three layers of dough. Don't be concerned if there are some cracks, especially during the first fold.
Step 4
Rotate the dough 90 degrees and repeat the rolling and folding process. This adds more layers of dough and fat, resulting in a flaky gluten-free piecrust. Have some extra flour handy in case the dough becomes sticky.
Step 5
Refrigerate the gluten-free dough for 15 minutes, then repeat the rolling and folding process two more times for a total of three tri-folds.
Step 6
Chill the dough for at least one hour before using. Better even overnight. This will give the flour time to hydrate and build a better gluten free piecrust. Store it in the refrigerator for up to 3 days or freeze for up to one month.
Apple Filling
Step 1
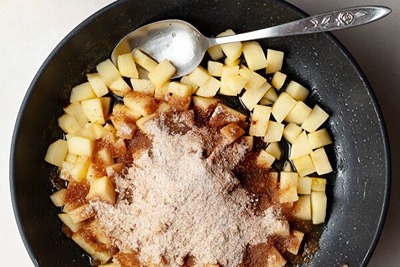
Peel, core, and dice the apples (about 1/2-inch dice) and set aside.
Step 2
Add butter to a medium sauté pan and allow for it to melt. Add the diced apples and sauté them at low-medium heat until soft and they have some color to them. This will take around 5-10 minutes.
Step 3
In the meantime, combine Domino® Light Brown Sugar, Domino® Golden Sugar, Cornstarch, Kosher Salt, Ground Cinnamon, Ginger and Nutmeg in a small bowl. Mix until well combined. Step: 4 Text: Once the apples are tender add the vanilla extract and dry ingredients and stir to combine. Allow the mixture to simmer until slightly thickened. Step: 5 Text: Remove from the heat and allow for it to cool completely before using. This can be done at room temperature or in the refrigerator.
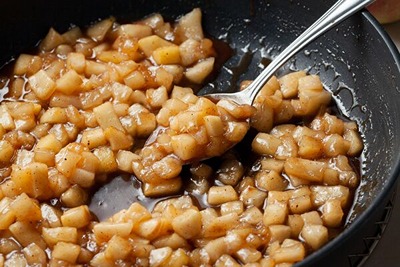
Step 4
Once the apples are tender add the vanilla extract and dry ingredients and stir to combine. Allow the mixture to simmer until slightly thickened.
Step 5
Remove from the heat and allow for it to cool completely before using. This can be done at room temperature or in the refrigerator.
Gluten Free Pie Dough
After chilling the dough for at least 60 minutes, take it out of the fridge and let it sit at room temperature for a few minutes. Make sure your Apple Filling is ready to use.
Step 1
Create an egg wash by whisking an egg with a small amount of milk(non-dairy is acceptable) or water in a small bowl. Set aside.
Step 2
Start by splitting the dough in half. This will make rolling out the dough a lot easier.
Step 3
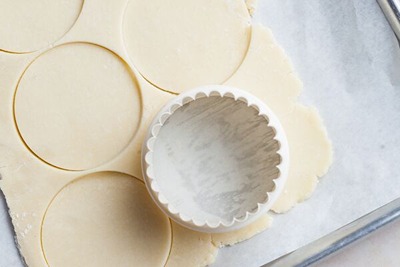
On a lightly floured work surface, roll out half of the dough until it is around ¼ inch thick rectangle. If the dough starts sticking to the surface or the rolling pin, sprinkle it with additional flour.
Step 4
Using a 3.5” cookie cutter cut out as many circles as possible from the gluten free pie dough. Reroll the dough scraps and cut out more circles. Place the circles on a parchment-lined sheet tray. Refrigerate the cutouts while you roll out the 2nd half of the dough. Make sure to refrigerate all the circles for at least 5 minutes before assembling the hand pies. A cool dough is easier to work with.
Filling the Handpies
Step 1
Arrange half of the pie circles on a parchment-lined baking tray. These are the bottom crust of the hand pies.
Step 2
Arrange half of the pie circles on a parchment-lined baking tray. These are the bottom crust of the hand pies.

Step 3
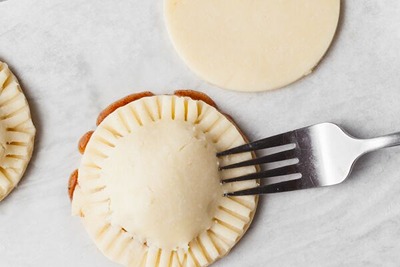
Take another dough circle and place it on top of the filling-covered circle. Gently press the edges down just so they create a seal.
Step 4
Use a fork to crimp the edges together and seal the hand pie. Be careful not to press too hard and puncture both layers of dough, or the edges may burn. If the filling starts to leak out, reduce the amount of filling used for the remaining gluten-free hand pies.
Step 5
Place the hand pies on a baking sheet lined with parchment paper. Repeat the process with the remaining dough circles and filling. Save any leftover egg wash for brushing the hand pies before baking.
Step 6
After assembling all the hand pies, cover them and refrigerate them for at least 30 minutes before baking. Chilling helps prevent the butter from melting too quickly during baking, which can lead to a tough crust instead of a flaky one.
Baking
Step 1
When ready to bake the gluten-free hand pies, preheat the oven to 425F.
Step 2
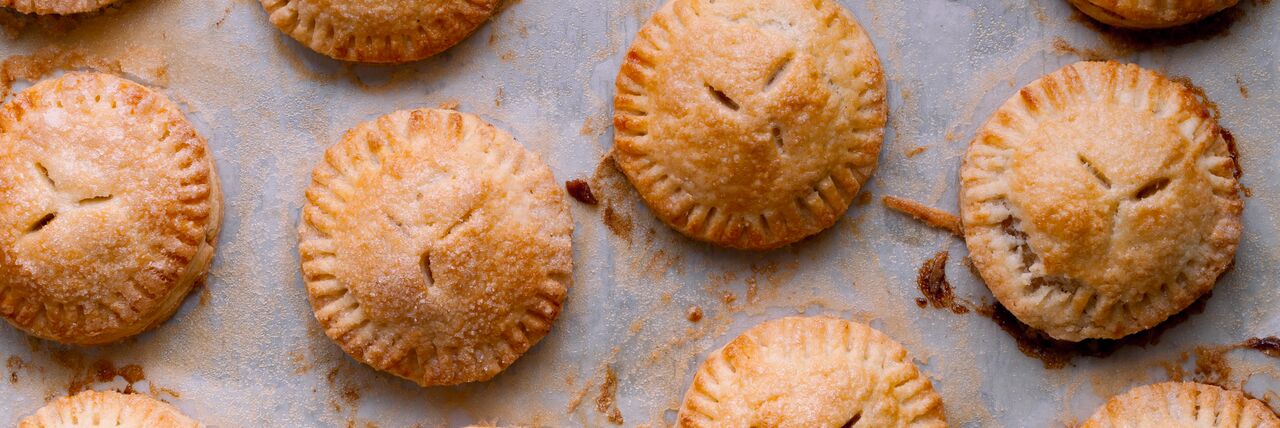
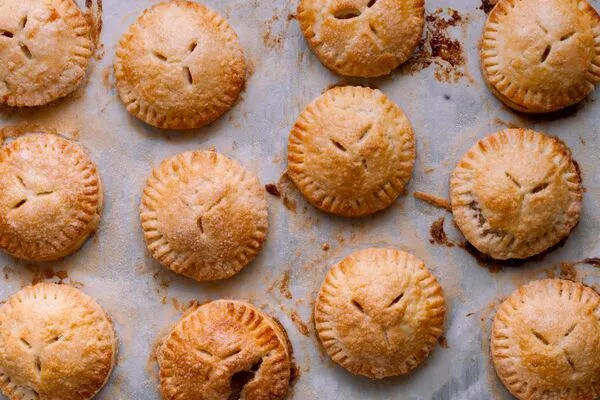
Place the hand pies on a sheet tray lined with parchment paper. Place the gluten free hand pies on a sheet tray lined with parchment paper. With a pairing knife, cut 2-3 slits in the top of every hand pie. The small slits allow air to escape when baking.
Step 3
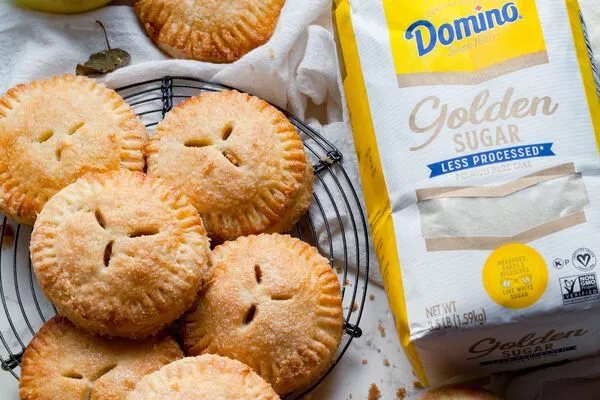
Brush each with some of the remaining egg wash and sprinkle generously with Domino® Golden Sugar.
Step 4
Bake the hand pies at 425F for 10 minutes, then reduce the temperature to 365F and continue baking for another 15 minutes, or until they turn golden brown and become puffy. You may also check the internal temperature, which should be above 205F.
Step 5
Once the hand pies are baked, remove them from the oven and place the sheet tray on a cooling rack. Let the homemade gluten-free hand pies cool for at least 20 minutes before serving
Additional Tips:
- Gluten Free Flour: I highly recommend using a gluten-free flour blend with Cornstarch being the first ingredient.
- Apples: Use your favorite baking apples such as Granny Smith, Fuji, Honey Crisp
- Storage: Gluten Free Hand Pies are the best when enjoyed the same day they have been baked. Store any leftover hand pies in a container at room temperature 1-3 days.
Rate Recipe


Meet the Chef:
Daniela Weiner
@Austrianwithwuff
Meet Daniela , the creator of The Gluten Free Austrian. She is a professionally trained Pastry Chef with an extensive background in fine dining as well as bakery-style establishments. Diagnosed with Celiac Disease during her teens, she's dedicated to crafting gluten-free recipes that capture the authentic flavors we all love. Daniela's creations blend the finesse of French pastries, the comfort of American classics, and a touch of her Austrian heritage, a nod to her upbringing.
Deliciousness Delivered to You
Join our E-newsletter community and you’ll be among the first to receive the latest special offers, recipes, tips and more. Join us!