
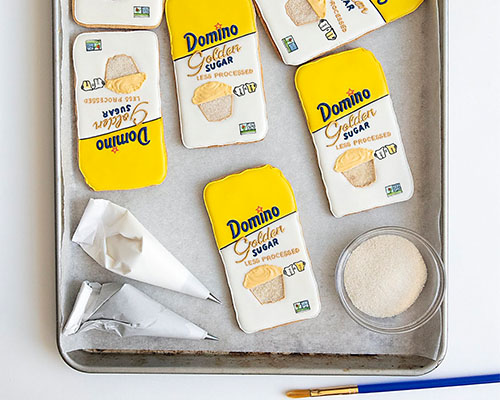


How to make Domino® Golden Sugar Packaging Cookies
Categories: Baking
Follow along with this tutorial from Cookie Artist Baked Ideas.
Step 1: Make the cookies:
Create your Golden Sugar Cookies using this recipe: Golden Sugar Cookies
Step 2: Prepare the icing and ice the cookie:
Prepare small bowls of colored royal icing, you may use this recipe Royal Icing in the amounts you will need, depending on how many cookies you are decorating. You will need white, yellow, and in lesser amounts, gold, navy, red and black. Keep your bowls of icing covered with plastic wrap or wet paper towel at all times to prevent drying out. Put yellow and white each in a piping bag fitted with a small (#1.5) tip. Make a rough stencil to define the areas on the cookies that you will be filling in with each color. Remember to leave a space unpainted where the cupcake will go. Outline the top area in yellow and the bottom area in white. With a brush, paint in those two areas so that the icing flows smoothly into the spaces. Allow the icing to dry until hard, possibly overnight.
Step 3: Writing and small decorating details:
Fit piping bags with small tips, #1 or smaller, and fill them with navy, gold and black icings. Write “Domino” where it belongs on the package. If you like, you can carefully use a fine-tipped edible marker to stencil or draw the letters on first as a guide. Otherwise, just place them as best you can. Next, use the gold color to write “Golden,” mimicking the font on the package. Then use the blue icing to write “Sugar”. Next, use the gold to write “less processed.” Load the red icing into a small tip and pipe a tiny star above the letter “i” in Domino®. Put the black icing in a small tip and make a black diagonal dividing line between the white and the yellow areas, being careful not to line on top of the letter “G” of “Golden.”
Use the black icing to make two tiny measuring cups with equal signs between them. For the cup with the golden sugar in it, brush a tiny bit of yellow icing diluted with water, onto one of the measuring cups. Allow it to dry and finish the black details.
Step 4: The cupcake:
Thin out a little white icing with water and with a brush, apply some icing where the cupcake belongs. Immediately place some Golden Sugar in that space and let it sit 2 - 3 minutes until the sugar adheres. For the frosting on the cupcake, take some of the gold icing and with a stiff brush or the tip of a knife, apply the frosting in swirls to give the look of a real cupcake.
Step 5: Non-GMO label and painting gold (optional)
Use diluted food coloring to paint on the label on the lower right corner of the bag. Painting this small takes practice. You can just dab on some areas of color to create the general look or try using edible markers for this step.
For an added touch, paint edible gold on the word “Golden.” To do this, dilute edible gold dust with vodka or lemon extract. With a tiny brush, paint each letter with the gold, making the mixture thick enough to cover evenly.
TIP: If you prefer, or you are working with kids, try using edible markers for any details, including lettering!

Meet the Chef:
Patti Paige
@bakedideas
Patti Paige is an artist, baker, and owner of Baked Ideas, a custom bakery in New York City. She and her small staff decorate cookies and cakes that reflect her affinity for clean simple design, vibrant color, originality, humor and artistic flair. Memories of the shaped cookies her grandmother used to make, a master’s degree in painting, and a lifelong habit of making things in and out of the kitchen, have resulted in confections that are as fun and fabulous to look at as they are to eat.
Deliciousness Delivered to You
Join our E-newsletter community and you’ll be among the first to receive the latest special offers, recipes, tips and more. Join us!